Note 1
数组去重
const arr = [1, 2, 3, 4, 5, 2, 5, 6, 7, 8, 3, 9]
console.log('使用set除重:', [...new Set(arr)])
const res = arr.filter(item => arr.indexOf(item) === -1)
console.log('filter去重:', res)
function removingDuplicate (arr) {
  const len = arr.length
  let i = 0
  const res = []
  while (i < len) {
    if (!res.includes(arr[i])) {
      res.push(arr[i])
    }
    i++
  }
  return res
}
console.log('removingDuplicate:', removingDuplicate(arr))
监听滚动条变化
// 防抖
function throttle (fn, delay = 300) {
  var valid = true
  return function () {
    if (valid) {
      valid = false // 将函数置为无效
      setTimeout(() => {
        fn()
        valid = true
      }, delay)
    }
    return false // valid为false时,函数不执行
  }
}
function showTop () {
  var scrollTop = document.body.scrollTop || document.documentElement.scrollTop
  console.log('滚动条位置:' + scrollTop)
}
window.onscroll = throttle(showTop, 300)
复制文本到剪切板
<p id="text">待复制文本</p>
<a @click="onCopy">{{ copyText }}</a>var copyText = 'copy'
onCopy () {
const text = document.getElementById('text')
navigator.clipboard.writeText(text.innerText || '').then(() => {
/* clipboard successfully set */
copyTxt = 'Copied'
}, (err) => {
/* clipboard write failed */
copyTxt = err
})
}剪贴板 Clipboard API 提供了响应剪贴板命令(剪切、复制和粘贴)与异步读写系统剪贴板的能力。从权限 Permissions API 获取权限之后,才能访问剪贴板内容;如果用户没有授予权限,则不允许读取或更改剪贴板内容。
访问剪贴板
除了在实例化中创建一个 Clipboard 对象,你还可以使用全局的
Navigator.clipboard来访问系统剪贴板。read()从剪贴板读取数据(比如图片),返回一个 Promise 对象。在检索到数据后,promise 将兑现一个
ClipboardItem对象的数组来提供剪切板数据。Clipboard.readeText()从操作系统读取文本;返回一个 Promise,在从剪切板中检索到文本后,promise 将兑现一个包含剪切板文本数据的 DOMString。
解析系统剪贴板的文本内容返回一个Promise 。js// 粘贴(读取剪贴板) // 检索剪贴板的文本内容,并将返回的文本插入元素的内容中 navigator.clipboard.readText().then( clipText => document.querySelector('.editor').innerText += clipText )上述代码提取了剪贴板的文本并将其附在 class 为 editor 的第一个元素后面。因为当剪贴板中不是文本时, readText() (and read(), for that matter) 会返回一个空字符串,所以这段代码是安全的。
write()写入任意数据至操作系统剪贴板。这是一个异步操作,在操作完成后,返回的 promise 的将被兑现。
写入图片等任意的数据到剪贴板。这个方法可以用于实现剪切和复制的功能。js// 这个例子展示了如何将当前剪贴板的内容替换为给定的内容。 function setClipboard(text) { let data = new DataTransfer() data.items.add("text/plain", text) navigator.clipboard.write(data).then(() => { /* success */ }, () => { /* failure */ }) }Clipboard.writeText()写入文本至操作系统剪贴板。返回一个 Promise,在文本被完全写入剪切板后,返回的 promise 将被兑现。
可以写入特定字符串到操作系统的剪切板js// 复制(写入剪贴板) // 此示例将剪贴板的内容设置为字符串“<empty clipboard>” navigator.clipboard.writeText('<empty clipboard>').then(() => { /* clipboard successfully set */ }, () => { /* clipboard write failed */ })
<video> 标签相关事件
const video = document.getElementById('veo')
video.addEventListener('pause', () => { // 播放暂停时触发,视频播放完时也会触发
  this.vplay = true
  var current = Math.floor(video.currentTime) // 播放暂停时获取已播放时长并向下取整
  console.log('播放暂停时的已播放时长:', current)
})
video.addEventListener('playing', () => { // 开始播放时触发,包括暂停重新播放,快进到某个时间点开始播放
  this.vplay = false
  var current = Math.floor(video.currentTime) // 开始播放时获取已播放时长并向下取整
  console.log('开始播放时的已播放时长:', current)
})
video.addEventListener('timeupdate', () => { // 播放时触发,即与视频播放同步触发,播放时大约1s内触发4次
  var current = Math.floor(video.currentTime) // 播放时获取已播放时长并向下取整
  console.log('播放时的已播放时长:', current)
})
video.addEventListener('ended', () => { // 播放完成时触发
  var current = Math.floor(video.currentTime) // 播放完成时获取已播放时长并向下取整
  console.log('播放完成时的已播放时长:', current)
})
console.log('视频时长:', video.duration)
// 设置视频的播放开始时间点,单位 s
video.currentTime = 10
video.play() // 播放
video.pause() // 暂停
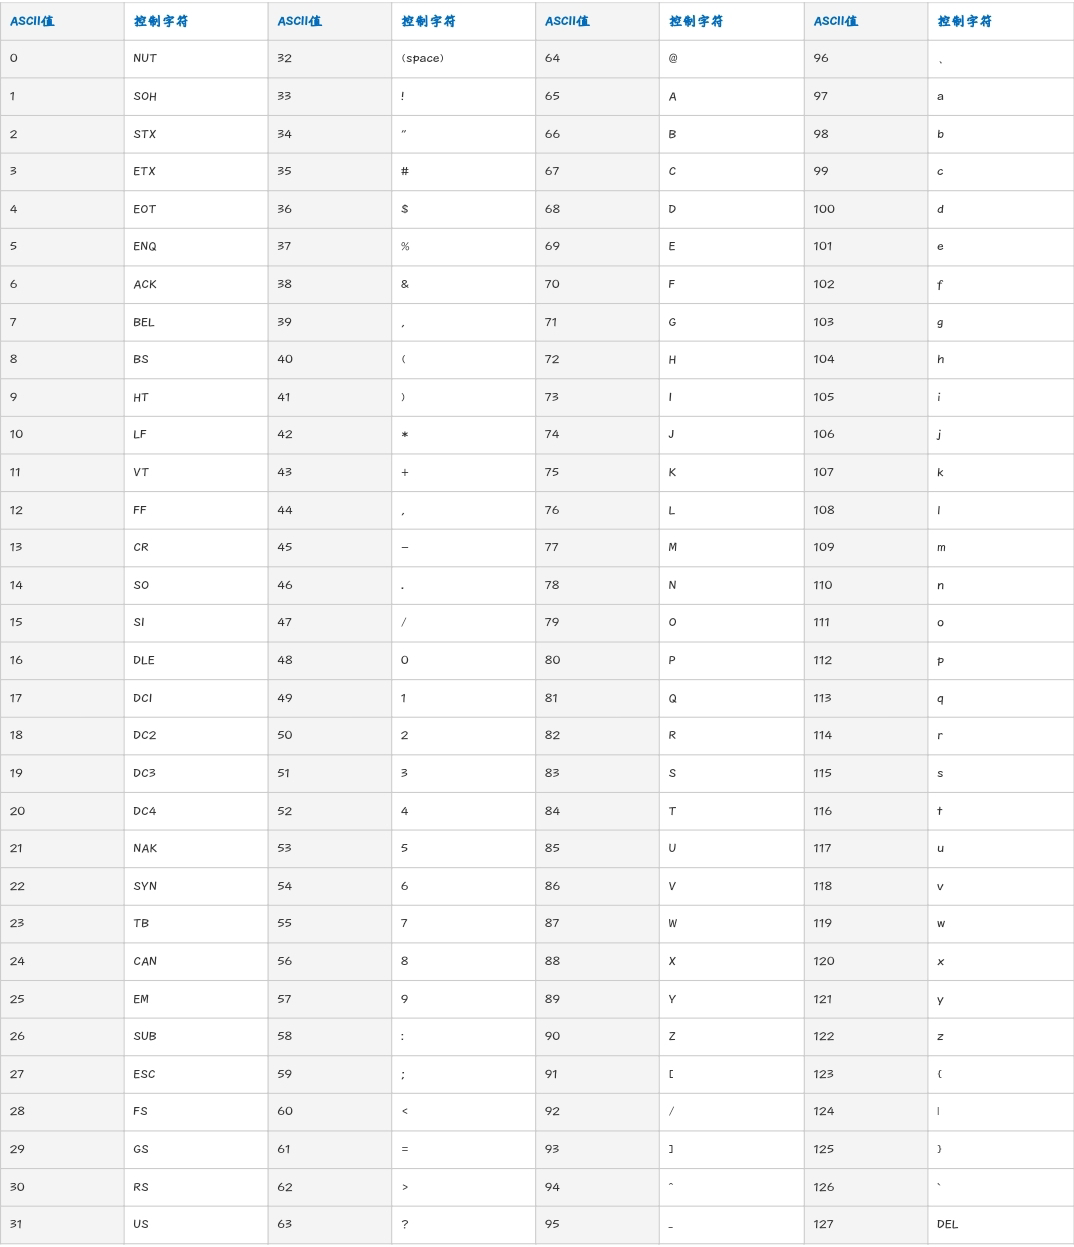
字母和ASCII码转换
- ASCII码转字符
String.fromCharCode(65) // 'A'
String.fromCharCode(97) // 'a'- 字符转ASCII码
var str1 = 'A'
str1.charCodeAt() // 65
var str2 = 'a'
str2.charCodeAt() // 97- ASCII表

scrollIntoView()将指定元素滚动到浏览器窗口的可视区域
Element 接口的 scrollIntoView() 方法会滚动元素的父容器,使被调用 scrollIntoView() 的元素对用户可见。
语法
scrollIntoView()
scrollIntoView(alignToTop)
scrollIntoView(scrollIntoViewOptions)
参数
alignToTop可选一个布尔值:true,元素的顶端将和其所在滚动区的可视区域的顶端对齐。相应的scrollIntoViewOptions: {block: 'start', inline: 'nearest'}这是这个参数的默认值。false,元素的底端将和其所在滚动区的可视区域的底端对齐。相应的scrollIntoViewOptions: {block: 'end', inline: 'nearest'}。
scrollIntoViewOptions可选一个包含下列属性的对象:behavior可选定义滚动是立即的还是平滑的动画。该选项是一个字符串,必须采用以下值之一:smooth:滚动应该是平滑的动画。instant:滚动应该通过一次跳跃立刻发生。auto:滚动行为由scroll-behavior的计算值决定。
block可选定义垂直方向的对齐,start、center、end 或 nearest 之一。默认为 start。inline可选定义水平方向的对齐,start、center、end 或 nearest 之一。默认为 nearest。
返回值
无(undefined)
示例
const element = document.getElementById('box')

element.scrollIntoView()
element.scrollIntoView(false)
element.scrollIntoView({ block: 'end' })
element.scrollIntoView({ behavior: 'smooth', block: 'end', inline: 'nearest' })
场景1:将 id 为 content 的元素,滚动到可视窗口
<a @click="onScroll"></a>onScroll () {
const el = document.getElementById('content')
el.scrollIntoView()
}场景2:滚动到指定锚点
<!-- (必须用id选择器) -->
<a href="#content"></a>
场景3:进入页面后,将指定元素显示在视口中
<div id="content"></div>goTop () {
const el = document.getElementById('content')
el.scrollIntoView()
}原生js相关BOM和DOM操作
- 获取DOM元素
<input
  id="upload"
  class="upload"
  name="upload"
  ref="upload"
  type="file"
  accept="image/*" />
getElementBy... 获取DOM元素:
const el = document.getElementById('upload') // 返回DOM对象
const el = document.getElementsByClassName('upload') // 返回key为0,1,2…的object,value为DOM对象
const el = document.getElementsByTagName('div') // 返回key为0,1,2…的object,value为DOM对象
const el = document.getElementsByName('upload') // NodeList对象,key为0,1,2…,value为DOM对象
console.log('upload:', this.$refs.upload) // vue的ref模板引用获取DOM元素
querySelector 使用 CSS选择符 获取DOM元素
var upType = document.querySelector('input[type="file"]')
var upName = document.querySelector('input[name="upload"]')
var upId = document.querySelector('#upload')
var upClass = document.querySelector('.upload')- 设置DOM元素的样式style
<img id="animate" ref="animateRef" class="u-img-5"/>// 使用ref修改特定元素的样式:
this.$refs.animateRef.style.top = 0
this.$refs.animateRef.style.opacity = 1
// 等价于使用原生JS修改:
const el = document.getElementById('animate')
el.style.top = 0
el.style.opacity = 1- 获取DOM元素各边缘距离浏览器可视窗口的距离(不包括滚动条)
Element.getBoundingClientRect() 方法
const el = document.getElementById('animate') // 获取DOM元素
// 或者 const el = this.$refs.animateRef
// 元素上边缘距浏览器窗口上边界的距离,可正,可负,可为0
console.log('distance:', el.getBoundingClientRect().top)
// 元素下边缘距浏览器窗口上边界的距离,可正,可负,可为0
console.log('distance:', el.getBoundingClientRect().bottom)
// 元素左边缘距浏览器窗口左边界的距离,可正,可负,可为0
console.log('distance:', el.getBoundingClientRect().left)
// 元素右边缘距浏览器窗口左边界的距离,可正,可负,可为0
console.log('distance:', el.getBoundingClientRect().right)
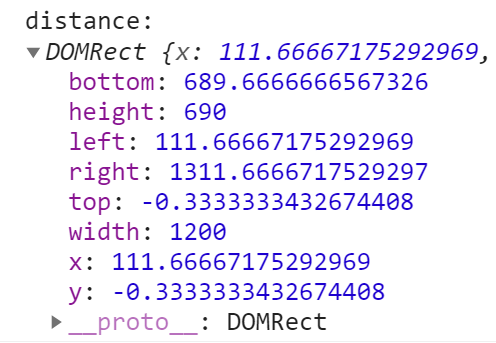
console.log('distance:', el.getBoundingClientRect())
// x,y:即元素左上角的像素点相对于浏览器显示窗口左上角点的坐标
window对象表示一个包含 DOM 文档的窗口,其 document 属性指向窗口中载入的 DOM 文档
// 浏览器窗口可视区域的高度
window.innerHeight
// 浏览器窗口可视区域的宽度
window.innerWidth
// 获取/设置当前页面地址(URL)或把浏览器重定向到新页面
window.location
// 打开一个新的页面
window.open()
/*
  window.scrollX的别名,
  页面的水平滚动距离,即浏览器窗口左边界离页面左端的距离(页面水平滚动的距离)
*/
window.pageXOffset
/*
  window.scrollY的别名,
  页面的垂直滚动距离,即浏览器窗口上边界离页面顶端的距离(页面垂直滚动的距离)
*/
window.pageYOffset- 判断一个元素是否在浏览器视口中:
<div id="slider" ref="slider"></div>isInViewport () {
const el = this.$refs.slider
const rect = el.getBoundingClientRect()
const viewWidth = window.innerWidth || document.documentElement.clientWidth
const viewHeight = window.innerHeight || document.documentElement.clientHeight
if (rect.right < 0 || rect.bottom < 0 || rect.left > viewWidth || rect.top > viewHeight) {
return false
}
return true
}